5-Minute Latin Piano Groove

One of the hallmarks of latin music is the latin piano breakdown. You know, that section where the band drops out and the piano player is playing some killer rhythmic groove all alone for a few bars before the band re-enters? I remember always loving those piano moments in latin music (in fact, one of my all-time favorite latin piano grooves to this day can be found at the 2:28-2:44 mark of this latin pop hit). Sometimes referred to as a piano montuno, these grooves usually consist of a repetitive rhythmic figure or theme and generally found in Latin or Afro-Cuban music. The piano montuno is a sort of syncopated comping pattern that outline a chord or chords within a piece of music. Oftentimes, the chords themselves are quite simple - it's the rhythm and syncopation that is often challenging. But these grooves are fun to play specifically because they are so rhythmic, and for that reason practicing them can really help us, as pianists, work on our rhythmic feel and precision. In this article I'll teach you a killin' (yet simple) latin piano groove in 3 steps that uses only three chords. This simple little groove can be used as a comping pattern to build energy and excitement - and I'll even show you a simply way to keep building that excitement as you play the groove.
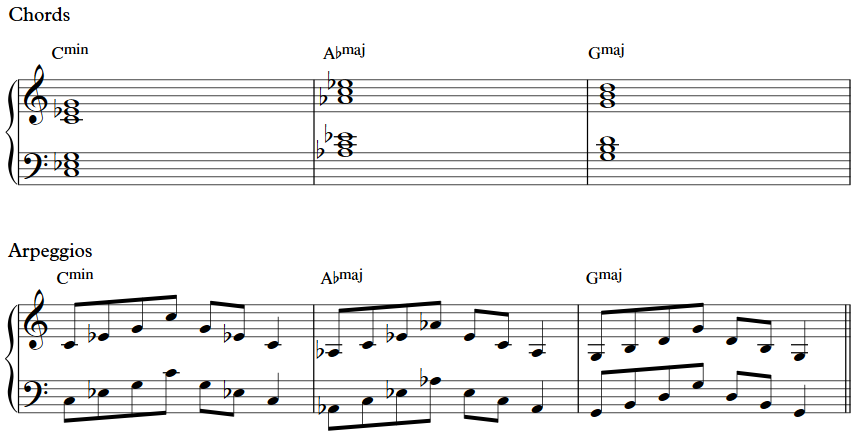
Step 1: Learn a C minor, Ab major, and G major triad.
That's right, just three simple little chords. Practice playing them in both hands and arpeggiate the notes of the chords (that means be able to play the notes of each chord one note at a time in ascending and descending order). Also make sure to use a fingering that allows you to play the notes of the chords smoothly. Then, practice transitioning from one chord to the next in time.
Step 2: Learn a rhythmic syncopation for these arpeggios.
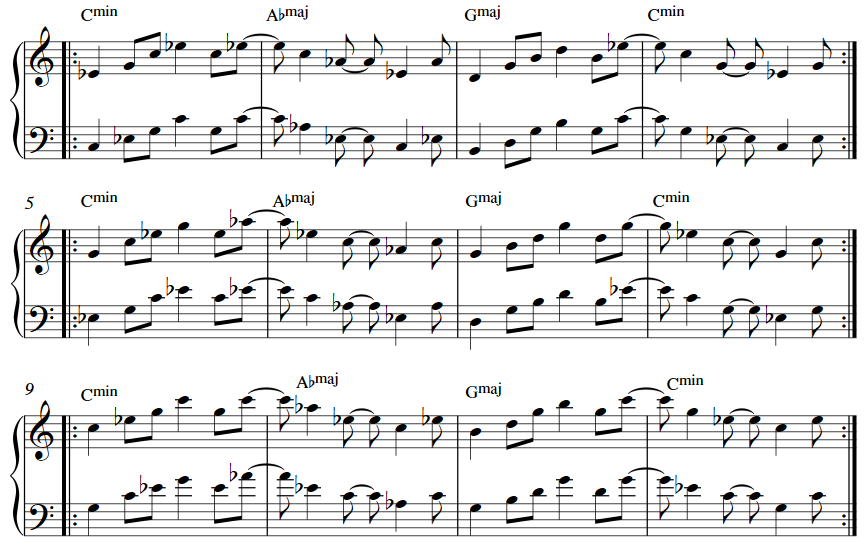
The rhythmic aspect of the latin piano grooves can oftentimes be the trickiest part of mastering them. It's important to start slowly, practice counting and subdividing, and work with your metronome. Below I've notated the rhythmic figure with the subdivisions written in the middle of the staff to help you with your counting. Practice playing the arpeggios with this rhythmic figure in both hands simultaneously. Start slowly and gradually work to increase your speed.
Step 3: Outline the chords in the right hand in a different inversion.
What do I mean by "inversion"? Simply change the order of the notes in the arpeggio. For instance, in the C minor measure (bar 1), instead of playing 'C-Eb-G-C' you will play 'Eb-G-C-Eb.' Continue to play the left hand as written.
Once you've played and mastered the above latin piano groove, here's a tip for how to give the groove a little boost of energy after you've played it a few times. Simply move the arpeggios (in both hands) up another inversion, and then another inversion. Notice that every time the chords are moved up to the next inversion it gives the groove a slight kick of excitement.
Are you a big fan of latin piano grooves? Wanna learn some more of these classic latin piano grooves, complete with sheet music, videos, and step-by-step instruction? Well you're in luck because we have a great Quick Latin Grooves lesson for you to check out!


